



Website owners using Cloudflare and Imunify360 may sometimes encounter an annoying verification problem where visitors repeatedly see the message “Please wait while your request is being verified.” Instead of loading the requested webpage, the browser remains stuck on the verification screen or keeps displaying the CAPTCHA challenge.
This problem can occur when Cloudflare’s caching configuration interferes with Imunify360’s Anti-Bot Challenge. Although both services can work correctly independently, certain combinations of caching settings can prevent the verification process from completing successfully.
The good news is that you do not necessarily need to disable Imunify360, turn off Cloudflare, or remove all your caching rules. In many cases, reviewing and correcting the Edge Cache TTL configuration can resolve the issue.
Why Cloudflare and Imunify360 Cause an Endless Verification Loop
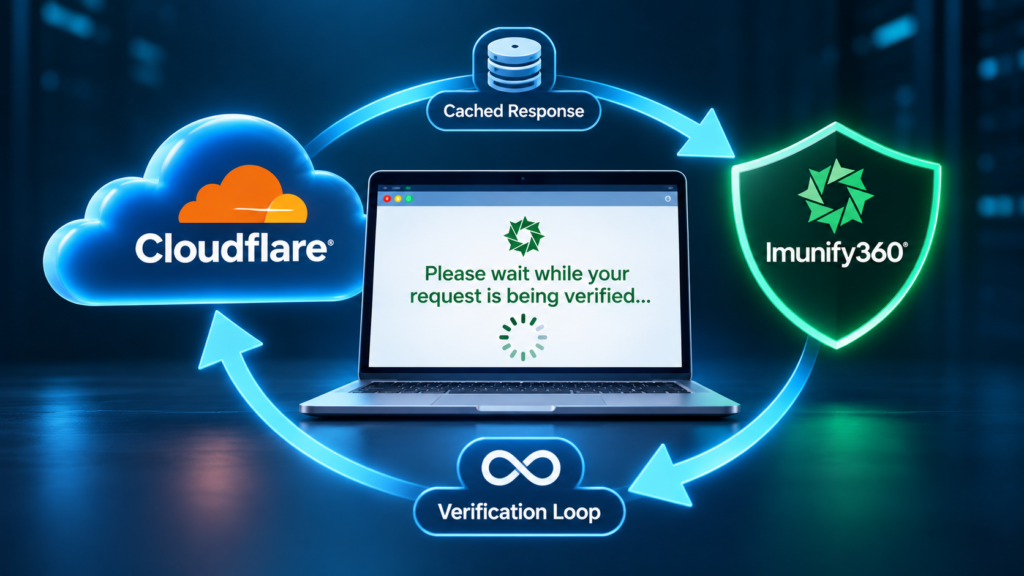
Cloudflare works as a reverse proxy between visitors and the website’s origin server. It provides CDN caching, traffic management and security features, while Imunify360 protects the server against malicious requests, automated attacks and suspicious visitors.
Imunify360 includes an Anti-Bot Challenge that checks whether incoming visitors are legitimate users or automated bots. The verification process relies on JavaScript and browser cookies to complete successfully.
However, when Cloudflare aggressively caches website responses, it can interfere with the verification process.
For example, Cloudflare might cache an Imunify360 CAPTCHA or verification response and continue serving that cached response to visitors. Even after a visitor successfully completes the challenge, the browser may receive the previously cached verification page instead of the actual website.
This can create an endless verification loop.
Imunify360 has acknowledged this compatibility issue in its official documentation. The company specifically warns that its WebShield Anti-Bot Challenge is incompatible with aggressive CDN caching configurations, including certain Cloudflare Browser Cache TTL and Cache Everything configurations involving Edge Cache TTL.
Solution 1: Remove Edge Cache TTL from Cloudflare Page Rules
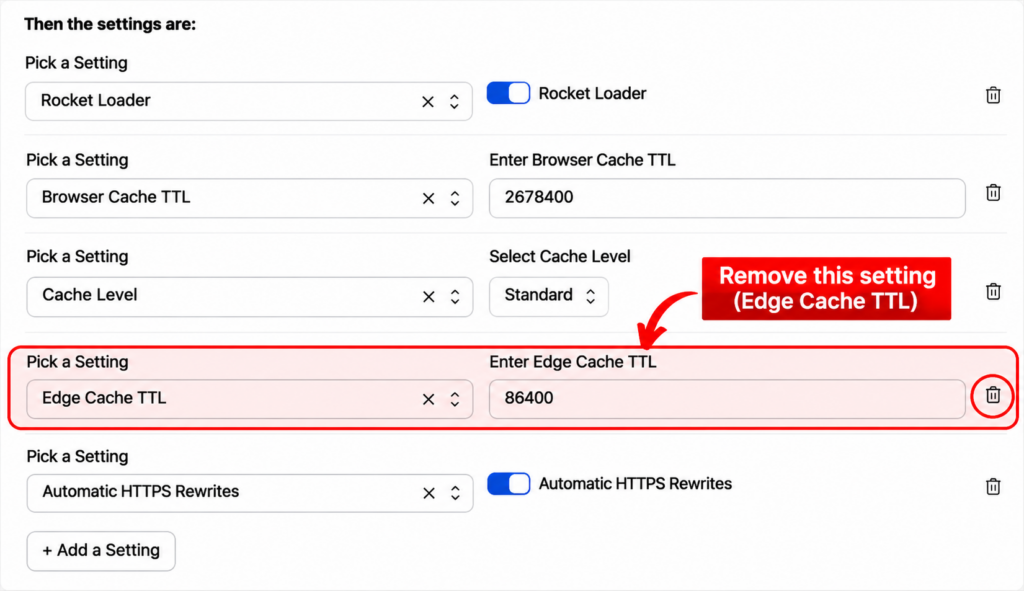
This is the first configuration you should check when troubleshooting the verification loop.
Cloudflare’s Edge Cache TTL setting determines how long eligible content remains cached in Cloudflare’s network. When combined with certain caching configurations, it can override the cache instructions provided by the origin server.
Imunify360 documented a problem involving Cloudflare’s Cache Everything feature combined with Edge Cache TTL. According to its explanation, this combination can cause Cloudflare to ignore origin cache-related headers and remove cookies from origin responses.
Since cookies are important for completing Imunify360’s browser verification, interfering with them can cause visitors to become stuck in the CAPTCHA process.
To check the configuration:
- Log in to your Cloudflare dashboard.
- Select the affected website.
- Navigate to Rules and open Page Rules if you are using the legacy interface.
- Review the Page Rules applied to your website.
- Look for a rule containing the Edge Cache TTL setting.
- Remove the Edge Cache TTL setting from the affected rule.
- Save the changes.
You do not need to delete the entire Page Rule. Remove the Edge Cache TTL setting and retain other settings that are not responsible for the conflict.
If you have multiple Page Rules, review each rule that matches the affected website URLs.
After saving the changes, test the website again in a private browser window.
Solution 2: Review the Cache Everything Setting
Another important setting to check is Cache Everything.
Cloudflare’s Cache Everything option treats content beyond its default static-file caching behavior as eligible for caching. This can include dynamic website responses that should not necessarily be served from a shared cache.
Imunify360 specifically warns against combining Cache Everything with Edge Cache TTL because the configuration can interfere with cookies and origin cache headers.
If you are using Cache Everything, consider changing the Cache Level to Standard or removing the aggressive caching configuration affecting dynamic pages.
Standard caching is generally more appropriate for websites that rely on server-side authentication, security challenges and dynamic responses.
You should also check whether another Cloudflare Cache Rule is applying similar caching behavior, even if the legacy Page Rule has already been corrected.
Solution 3: Change Browser Cache TTL to Respect Existing Headers
Browser Cache TTL is another setting worth reviewing.
It controls how long resources remain cached in visitors’ browsers. When configured to override the origin server’s cache instructions, it can prevent browsers from receiving updated responses when expected.
Imunify360 recommends setting Browser Cache TTL to Respect Existing Header rather than forcing a custom expiration period.
To review this setting:
- Open your Cloudflare dashboard.
- Select your website.
- Navigate to the applicable Page Rule or Cache Rule.
- Find Browser Cache TTL.
- Set it to Respect Existing Header where the available interface supports this option.
- Save the changes.
This allows the browser to follow the cache instructions supplied by your origin server instead of unnecessarily overriding them.
This recommendation is particularly important for websites that rely on dynamic responses and security verification.
Solution 4: Review Cloudflare Cache Rules
Cloudflare now provides Cache Rules for more flexible caching management.
Even if you have removed Edge Cache TTL from your old Page Rules, another Cache Rule could still be applying an aggressive caching policy.
Open your Cloudflare dashboard and navigate to Caching → Cache Rules.
Review the rules and look for configurations that:
- Override the origin’s Edge TTL.
- Cache all website responses regardless of their content.
- Override Browser Cache TTL.
- Apply custom caching to dynamic pages or security-related responses.
Where possible, configure Cloudflare to respect the origin server’s cache-control headers.
For websites using Imunify360, avoid caching CAPTCHA pages, verification responses, authenticated pages and other dynamic content that should be generated by the origin server.
Cloudflare’s Cache Rules provide options to respect origin cache headers, bypass caching by default, or explicitly override the origin’s instructions. Choose the configuration that matches your website’s caching requirements.
Solution 5: Purge Cloudflare Cache After Changing Settings
After modifying caching rules, previously cached responses may still be available at Cloudflare’s edge.
For this reason, clearing the existing Cloudflare cache is a useful additional troubleshooting step.
To do this:
- Open the Cloudflare dashboard.
- Select your website.
- Navigate to Caching → Configuration.
- Find the Purge Cache option.
- Purge the cache, using Purge Everything if necessary.
- Wait briefly and test the website again.
Purging the cache does not change the caching rules themselves. It removes existing cached content so Cloudflare can request fresh responses from the origin server.
Be aware that purging the Cloudflare cache does not clear files already stored in visitors’ local browser caches.
Solution 6: Check Browser Cookies and JavaScript
Imunify360’s Anti-Bot Challenge requires JavaScript and cookies to function correctly.
If the browser blocks cookies or JavaScript, legitimate visitors may have difficulty completing verification.
Check whether:
- JavaScript is enabled in the browser.
- Cookies are allowed for the website.
- Privacy extensions or script-blocking extensions are interfering with the verification process.
- The browser is blocking required website resources.
Testing the website in another browser or a private browsing window can help identify whether the problem is related to an existing browser session.
However, if the same verification loop occurs across multiple browsers and devices, investigate the server and CDN caching configuration rather than assuming the visitor’s browser is responsible.
Solution 7: Use Imunify360’s Workaround for Rare Verification Loops
Imunify360 also documents a workaround for rare cases where its Anti-Bot Challenge continues looping because of overly aggressive web-page caching.
The company recommends changing a configuration file on the server.
Open the following configuration file:
/etc/imunify360-wafd/wafd.conf
Add this option:
append_random_query=yes
Save the file and reload the Imunify360 WAFD systemd service:
systemctl reload imunify360-wafd
This setting appends a random query argument to URLs, helping prevent aggressive caching from repeatedly serving the same verification response.
However, this is an advanced server-side workaround, not the first solution to try. Imunify360 warns that websites and applications with strict URL argument validation may experience compatibility problems after enabling it.
Use this option only after reviewing the caching configuration and understanding its potential effects.
How to Identify Whether Cloudflare Caching Is Causing the Problem
If the verification screen continues appearing after changing the settings, investigate the actual HTTP responses.
You can use your browser’s Developer Tools to inspect the Network tab while loading the affected website.
Pay particular attention to:
If this article helped you, please consider supporting our work. Every small contribution keeps Abijita.com independent and running.

- Whether the verification page is being returned repeatedly.
- Whether the response contains unexpected cache-related headers.
- Whether required cookies are being set and sent back by the browser.
- Whether Cloudflare is serving a cached verification response.
- Whether the origin server is generating a fresh response.
Cloudflare response headers such as CF-Cache-Status can also help identify whether a response was served from cache or fetched from the origin.
A response marked HIT indicates that Cloudflare served the resource from its cache, while DYNAMIC or BYPASS can indicate that the response was not served from the regular cache. Interpret these headers alongside the applicable rules and origin response headers.

The “Please wait while your request is being verified” problem can be frustrating for website owners using Cloudflare and Imunify360, particularly when legitimate visitors cannot access their websites.
The first thing to investigate is the Cloudflare Edge Cache TTL configuration. If it is enabled in a matching Page Rule, remove that setting and test the website again. Also review Cache Everything, Browser Cache TTL and newer Cache Rules to ensure that Imunify360’s verification responses are not being cached or having their required cookies interfered with.
If the problem continues, purge the Cloudflare cache, check browser cookies and JavaScript, and investigate Imunify360’s documented workaround for rare verification loops.
The important thing is to identify the caching conflict before disabling security protection or making unnecessary changes to the server.