


cPanel is popular Linux-based web hosting control panel. It provides a graphical user interface to easily manage and host multiple websites on a single Virtual Private Server (VPS) or dedicated server. You can perform a number of tasks (uploading files, creating emails, setting cron jobs, handling databases, etc.) using this tool.
cPanel provides a user-level access interface where users can manage their web hosting. WHM (Web Host Manager) provides a root and reseller level access interface where users can manage settings related to server administration and account management. Here, we are going to learn how to install Cpanel on AWS Instances EC2 using Centos 7.
1. Install a Server on Amazon EC2

2. Choose the instance type

3. Change the default storage of 8 GB to 30 GB (In Free tier)

4. Allow the following inbound ports in AWS security group settings (FTP)20-21,(SSH) 22,(HTTP) 80,(HTTPS) 443,(cPanel) 2082-2083,(WHM)2086-2087,(webmail) 2095-2096

5. Now choose either existing key pair or create new key pair .In case of creating new key pair don’t forget to download the keypair and keep it in a safe place. It is required to login to the instance.

6. Now you can click on launch instance. once the instance is launched successfully attach the Elastic IP to the newly created instance. Elastic IP is required to have static IP to the instance.

Connecting to Your Linux Instance from Windows Using PuTTY
The following instructions explain how to connect to your instance using PuTTY, a free SSH client for Windows. After you launch your instance, you can connect to it and use it the way that you’d use a computer sitting in front of you.
Before you connect to your Linux instance using PuTTY, complete the following prerequisites:
- Verify the general prerequisites for connecting to your instance.
- Install PuTTY on your local computer.Download and install PuTTY from the PuTTY download page. If you already have an older version of PuTTY installed, we recommend that you download the latest version. Be sure to install the entire suite.
- Convert your private key using PuTTYgen
Convert Your Private Key Using PuTTYgen
PuTTY does not natively support the private key format (.pem) generated by Amazon EC2. PuTTY has a tool named PuTTYgen, which can convert keys to the required PuTTY format (.ppk). You must convert your private key into this format (.ppk) before attempting to connect to your instance using PuTTY.
To convert your private key
- From the Start menu, choose All Programs, PuTTY, PuTTYgen.
- Under Type of key to generate, choose RSA.

If you’re using an older version of PuTTYgen, choose SSH-2 RSA.
- Choose Load. By default, PuTTYgen displays only files with the extension
.ppk. To locate your.pemfile, select the option to display files of all types. - Select your
.pemfile for the key pair that you specified when you launched your instance and choose Open. Choose OK. - To save the key in the format that PuTTY can use, choose Save private key. PuTTYgen displays a warning about saving the key without a passphrase. Choose Yes.
Note
A passphrase on a private key is an extra layer of protection. Even if your private key is discovered, it can’t be used without the passphrase. The downside to using a passphrase is that it makes automation harder because human intervention is needed to log on to an instance, or to copy files to an instance.
- Specify the same name for the key that you used for the key pair (for example,
my-key-pair). PuTTY automatically adds the.ppkfile extension.


Your private key is now in the correct format for use with PuTTY. You can now connect to your instance using PuTTY’s SSH client.
Connecting to Your Linux Instance
Use the following procedure to connect to your Linux instance using PuTTY. You need the .ppkfile that you created for your private key.
To connect to your instance using PuTTY
- Start PuTTY (from the Start menu, choose All Programs, PuTTY, PuTTY).
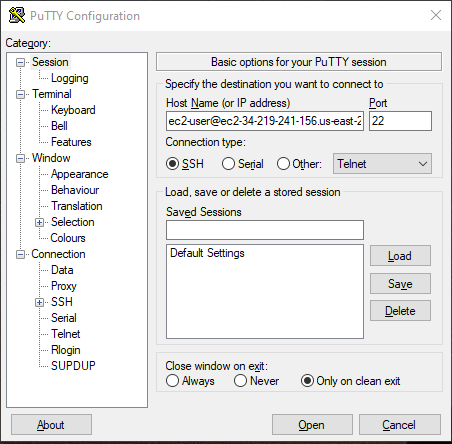
- In the Category pane, choose Session and complete the following fields:
- In the Host Name box, enter
user_name@public_dns_name(see Get Information About Your Instance for how to get the public DNS name of the instance). Be sure to specify the appropriate user name for your AMI. For example:- For Amazon Linux 2 or the Amazon Linux AMI, the user name is
ec2-user. - For a CentOS AMI, the user name is
centos. - For a Debian AMI, the user name is
adminorroot. - For a Fedora AMI, the user name is
ec2-userorfedora. - For a RHEL AMI, the user name is
ec2-userorroot. - For a SUSE AMI, the user name is
ec2-userorroot. - For an Ubuntu AMI, the user name is
ubuntu. - Otherwise, if
ec2-userandrootdon’t work, check with the AMI provider.
- For Amazon Linux 2 or the Amazon Linux AMI, the user name is
- (IPv6 only) To connect using your instance’s IPv6 address, enter
user_name@ipv6_address. Be sure to specify the appropriate user name for your AMI. For example:- For Amazon Linux 2 or the Amazon Linux AMI, the user name is
ec2-user. - For a CentOS AMI, the user name is
centos. - For a Debian AMI, the user name is
adminorroot. - For a Fedora AMI, the user name is
ec2-userorfedora. - For a RHEL AMI, the user name is
ec2-userorroot. - For a SUSE AMI, the user name is
ec2-userorroot. - For an Ubuntu AMI, the user name is
ubuntu. - Otherwise, if
ec2-userandrootdon’t work, check with the AMI provider.
- For Amazon Linux 2 or the Amazon Linux AMI, the user name is
- Under Connection type, select SSH.
- Ensure that the Port value is 22.
- In the Host Name box, enter
- (Optional) You can configure PuTTY to automatically send ‘keepalive’ data at regular intervals to keep the session active. This is useful to avoid disconnecting from your instance due to session inactivity. In the Category pane, choose Connection, and then enter the required interval in the Seconds between keepalives field. For example, if your session disconnects after 10 minutes of inactivity, enter 180 to configure PuTTY to send keepalive data every 3 minutes.
- In the Category pane, expand Connection, expand SSH, and then choose Auth. Complete the following:
- Choose Browse.
- Select the
.ppkfile that you generated for your key pair and choose Open. - (Optional) If you plan to start this session again later, you can save the session information for future use. Under Category, choose Session, enter a name for the session in Saved Sessions, and then choose Save.
- Choose Open.
- If this is the first time you have connected to this instance, PuTTY displays a security alert dialog box that asks whether you trust the host to which you are connecting.
- (Optional) Verify that the fingerprint in the security alert dialog box matches the fingerprint that you previously obtained in (Optional) Get the Instance Fingerprint. If these fingerprints don’t match, someone might be attempting a “man-in-the-middle” attack. If they match, continue to the next step.
- Choose Yes. A window opens and you are connected to your instance.

Installation of cPanel/WHM
Before installing cPanel you must have Perl installed on your server as cPanel is written in Perl. To install Perl on your system, login as root user and run the following command.
yum -y install perl
Now you will need to set the hostname for your server. A hostname is a FQDN or Fully Qualified Domain Name which will be used to identify your server. For example consider vps.mydomain.com – this is a FQDN which you can use as your hostname. To change your hostname run the following command
hostname vps.mydomain.com
You can replace vps.mydomain.com with your hostname. You must own the domain of which your are setting up the hostname. Next, you will need to change your current directory to /home directory, run the following command to do this.
cd /home
Download the installation script from cPanel website by executing the following command –
curl -o latest -L https://securedownloads.cpanel.net/latest
Now run the installation script by executing the following command –
If this article helped you, please consider supporting our work. Every small contribution keeps Abijita.com independent and running.

sh latest
This will start your cPanel installation, you can now sit back and relax as the installation takes around half hour to complete. Once the installation script is finished you will see the following output:
    2016-06-11 08:42:33  222 ( INFO): cPanel install finished in 21 minutes and 23 seconds!
    2016-06-11 08:42:33  938 ( INFO): Congratulations! Your installation of cPanel & WHM 11.56 is now complete. The next step is to configure your server.
    2016-06-11 08:42:33  938 ( INFO): Before you configure your server, ensure that your firewall allows access on port 2087.
    2016-06-11 08:42:33  938 ( INFO): On RHEL, CentOS, and CloudLinux systems, execute /scripts/configure_firewall_for_cpanel to accomplish this.
    2016-06-11 08:42:33  938 ( INFO): After ensuring that your firewall allows access on port 2087, you can configure your server.
    2016-06-11 08:42:33  938 ( INFO): 1. Open your preferred browser
    2016-06-11 08:42:33  938 ( INFO): 2. Type https://198.50.190.11:2087 in the address bar
    2016-06-11 08:42:33  938 ( INFO): 3. Enter the word root in the Username text box
    2016-06-11 08:42:33  938 ( INFO): 4. Enter your root password in the Password text box
    2016-06-11 08:42:33  938 ( INFO): 5. Click the Login button
    2016-06-11 08:42:33  938 ( INFO): Visit https://go.cpanel.net/whminit for more information about first-time configuration of your server.
    2016-06-11 08:42:33  938 ( INFO): Visit http://support.cpanel.net or https://go.cpanel.net/whmfaq for additional support
    2016-06-11 08:42:33  938 ( INFO): Thank you for installing cPanel & WHM 11.56!
You can now open your browser and go to https://your-server-ip:2087 to access WHM. Login with username root and your root account’s password. Make sure that you use https to access WHM in browser. For example if your IP is 192.168.0.85 then you will have to go to https://192.168.0.85:2087


